Hi Amazing people! Today i have got one of the recent requirements i came through.
Business Requirement: We had a string coming from a source which had to be compared with the account name and then further actions had to be followed. But certain accounts had special characters in it like “&” in “Larsen & Toubro” and other special characters.
Problem Faced: While writing the Fetch XML of comparison in “List Rows” action, if such special characters are present in the Account name, it throws an “Invalid XML” error.
Handling them on a case by case basis would be a nightmare plus its not the correct solution. So i digged into the functions available in Power Automate and found a life saviour – EncodeURIComponent()
Discussion: This function encodes a URI by replacing each instance of certain characters by one, two, three, or four escape sequences representing the UTF-8 encoding of the character.
It is widely used to return a string that replaces URL-unsafe characters with escape characters but can be utilised in such cases too. Let us see how!
Solution: Encode the string to be compared before sending it to fetch or within the Fetch itself.
PS: the Account name! Well i am awesome 😉
It will convert the special characters with escape characters like below:
Best part, it works for most of the special characters in use. Voila! Your flow runs successfully now:
Hope it helps! & the Power Affirmation of the day is: “I am proud of myself and my achievements”
Hello everyone! In this blog, we will learn how to customize the “Opportunity Close form” in Dynamics 365.
Business Requirement: Many times our clients have requirements where they want to capture essential details about why an opportunity was closed. By enabling this customization, sales representatives can provide valuable insights, helping sales managers develop better strategies.
Solution: So usually, when the users go through the normal opportunity process closure process, they will get only limited features while they choose “Close as Won” or “Close as Lost” on the Ribbon.
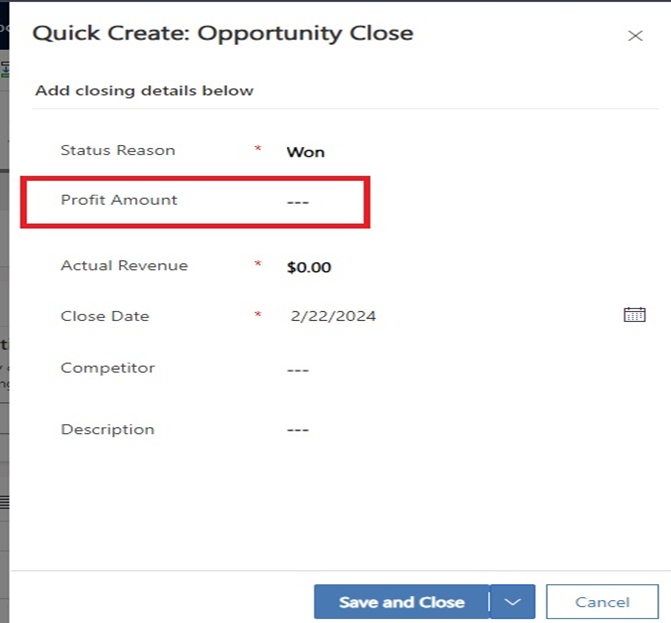
where they will get only these 5 fields to capture details.
But sellers can record relevant information such as the reason for closing an opportunity, profit margins,etc. These details help sales managers gain key insights and develop better strategies. Also, it allows an opportunity for more comprehensive reporting and analysis.
Implementation:
Login into your Power Apps.
Open “Sales Hub” App.
On the left bottom corner, click on “Sales”.
And change area to “App Settings”.
Click on “Lead+opportunity management”.
Switch to “Opportunity Closing”.
Turn radio button to yes and hit the save button.
Now edit your “Opportunity Close” form.
Add desired custom field, for eg; in my form I have added “Profit Amount”.
Save and publish your form.
Lets see it in action! Go back to the Power App and click on “Close as Won” or “Close as Lost”,you will see that the dialog box won’t pop-up this time. Instead, the form will load as a “Quick create form”.
Voila! Now you can store as much information as you want with multiple details to analyze. Hope it helps..
& the Power Affirmation for the month is : “I am Strong and I will continue to be the same.”
Business Scenario: Well we have all used Excel to get columns of Month name from a Date and then we can count and have a pivot around it. If we have a similar such requirement in Dynamics 365, where we have the date value, how to get its Month name automatically in a column? What comes to your mind? Calculated column would be the first thought right, try it out, i did, but no luck! This made me think that Microsoft must have definitely come up with a solution for this as this is an everyday scenario. I researched on it and landed on the much powerful Fx formula datatype
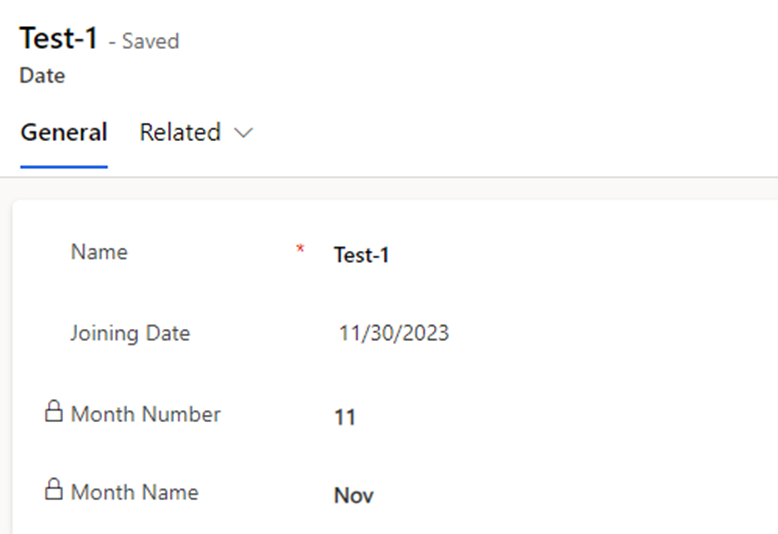
Solution: So i have a joining date column and when the record is created(not necessarily as data input on the form but by import or other ways), I want the Month Number & Month Name automatically populated so that later i can use it for reporting purpose, how many people joined in respective months. So how do I do it?
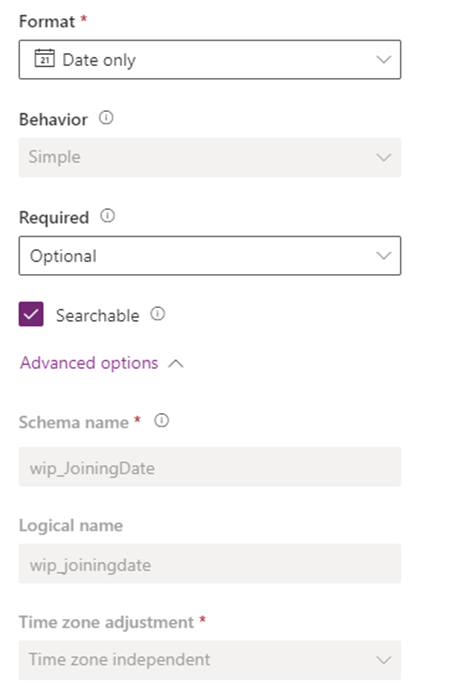
Step 1: Firstly your Date column should be “Date Only” and the Time Zone Adjustment should be made “Time Zone Independent”
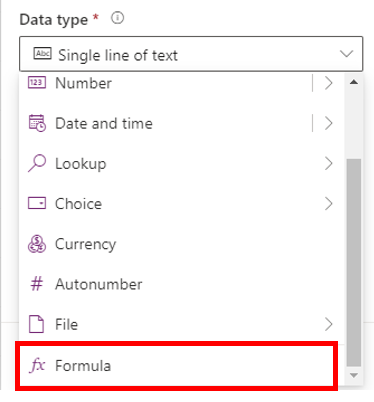
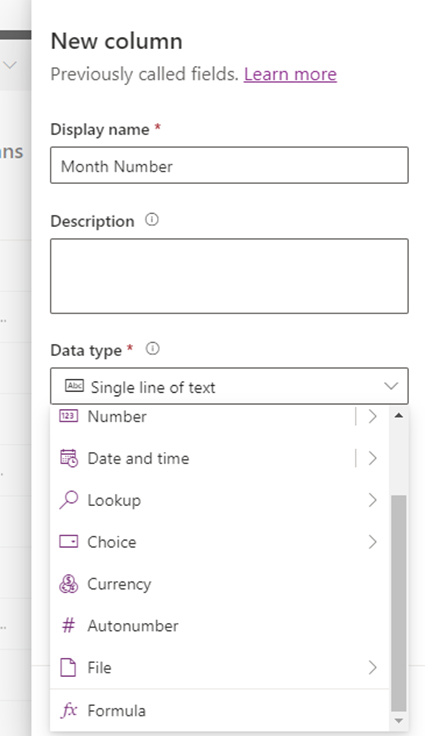
Step 2: Make the Month Number column as “fx formula” type
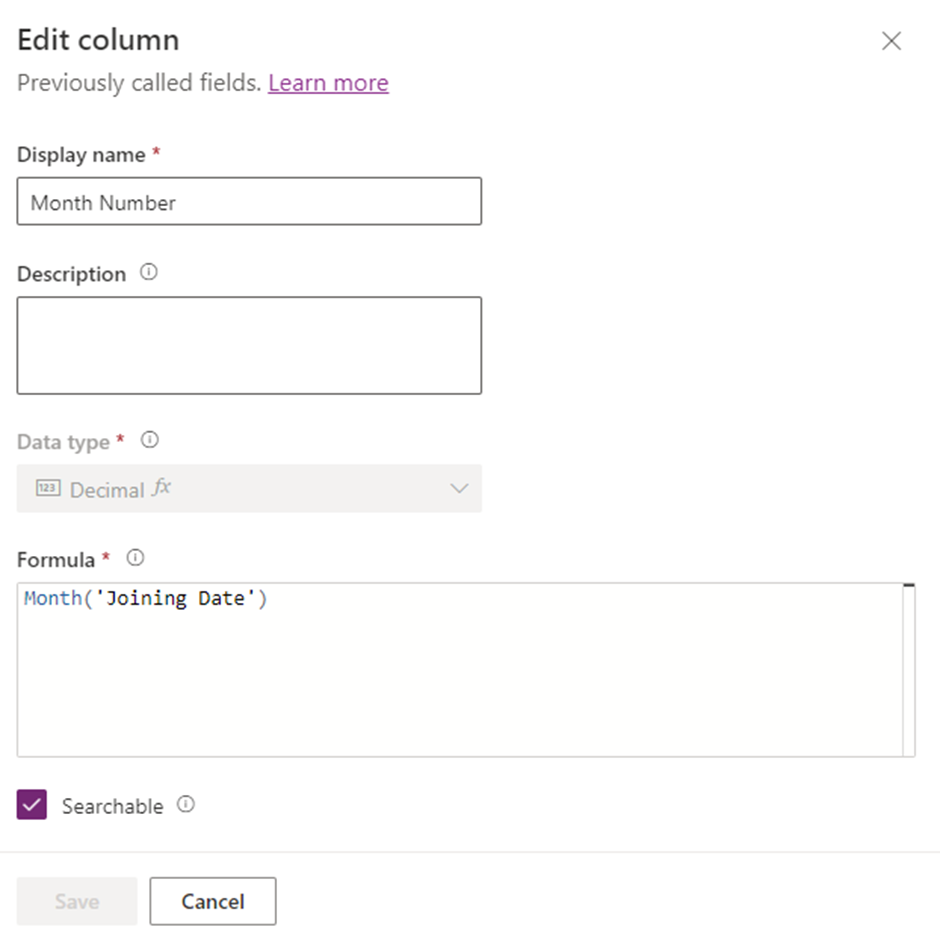
and write in the formulae
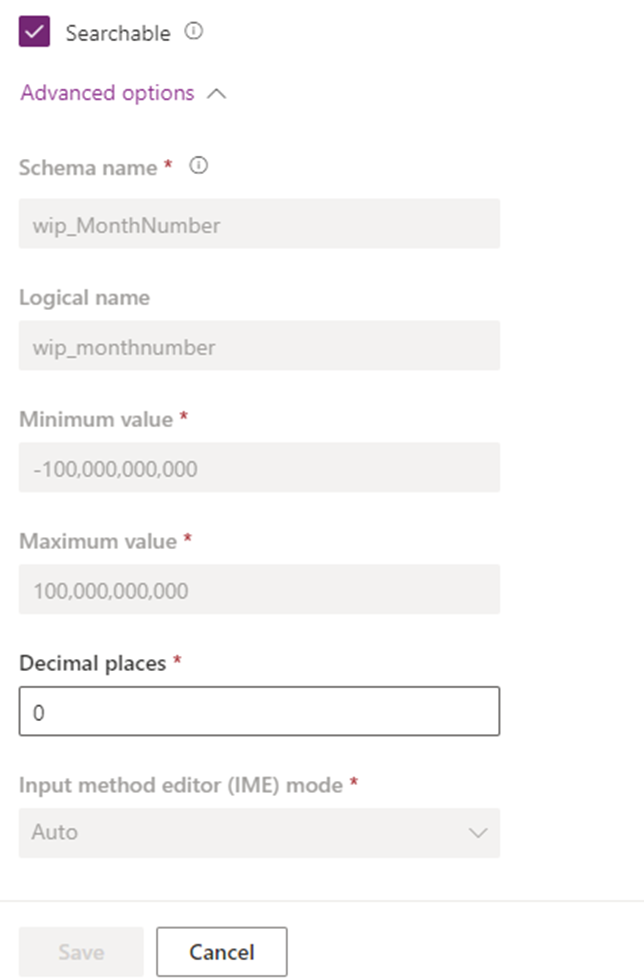
Notice that Month() just gives you the number and it has automatically taken the datatype as Decimal fx. Thus it will give you the value 11.00. To make it just 11. Go to advanced find and make the decimal places as 0.
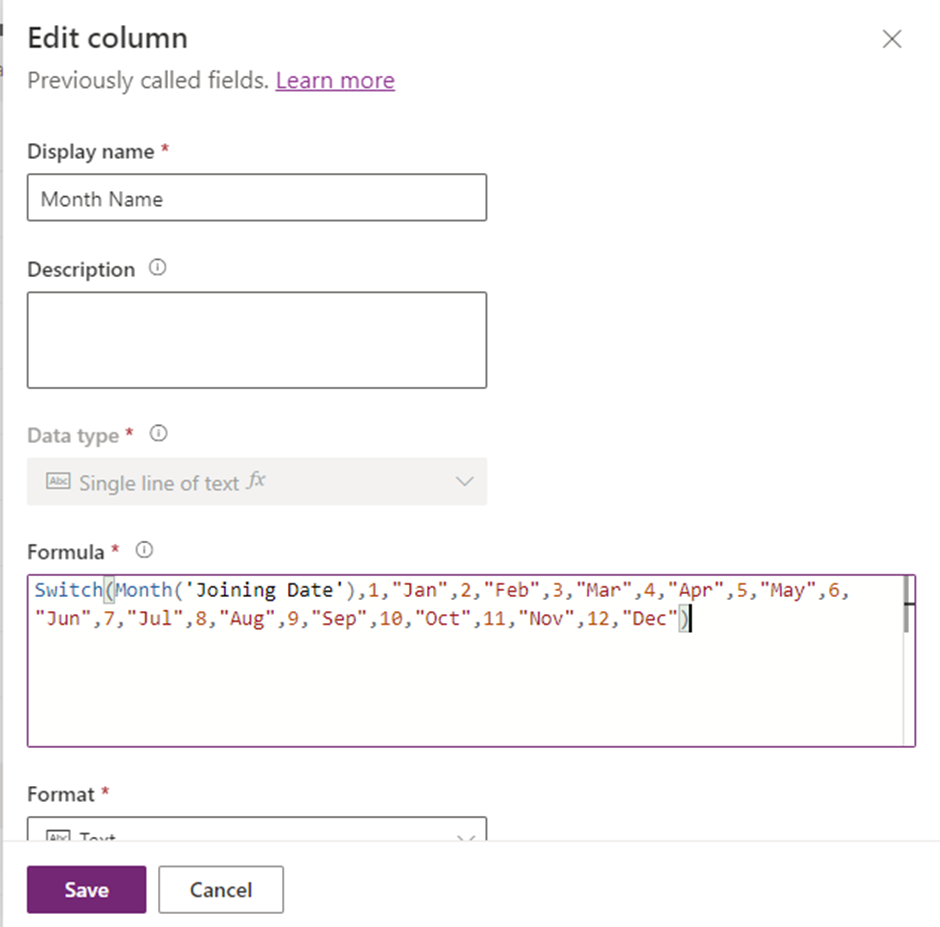
Now how to get the month name !? there is no nameOfMonth() function !? Well..
Step 3: Make the Month Name column as “fx formula” type and write in a simple switch statement for it.
& you are done.. Hope it helps!
This brings to another interesting use case we use around pivots in excel, what if now i wanted to count the number of joinees in each month? How can i add a column of Headcount which will store “1” in general and i can sum up all such 1’s according to the months and get the result? Think on it – will you now use calculated column or fx formulae.
& the Power Affirmation for this month in particular and this year in general is: ” I will be consistent!”
So, we have earlier learnt about the workflow() function in Power Automate. Today, let me tell you one of the other use case of it.
Business Requirement: After a while, there would be many runs of both the Parent & the Child flows and at some point it will become very difficult to connect the two related flow runs in case if the child flow runs are failing and you wanted to debug it. It will be extremely difficult to locate the respective parent flow run from the child flow run.
Solution: Thus in this blog, we will learn firstly how to create a child flow from parent flow & then how to quickly find the parent from the child without any hustle. Let’s Start!
Use: Why do we use Child Flow anyway ? It can perform a specific function or task that is reusable across different parent flows. This is a useful technique if you want to reuse some logic or functionality in multiple flows, or if you want to break down a complex flow into smaller parts.
Let’s create the child flow first:
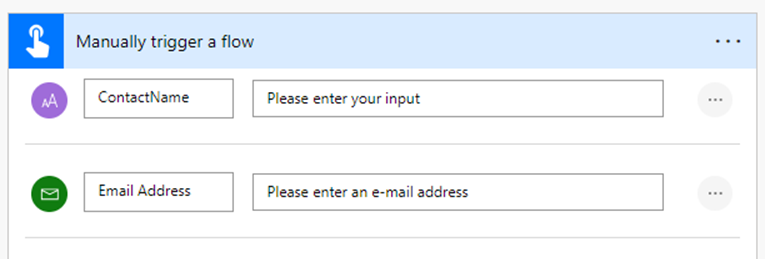
Step 1: Trigger
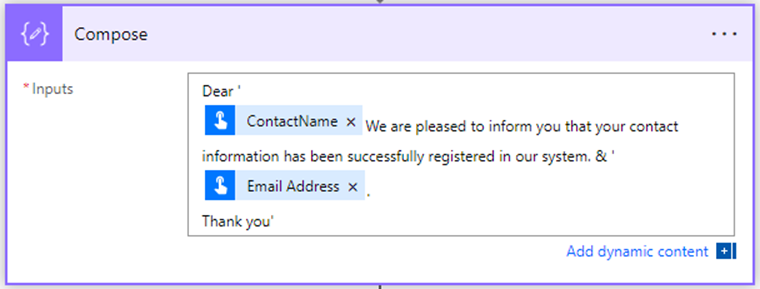
Step 2: Compose the email body
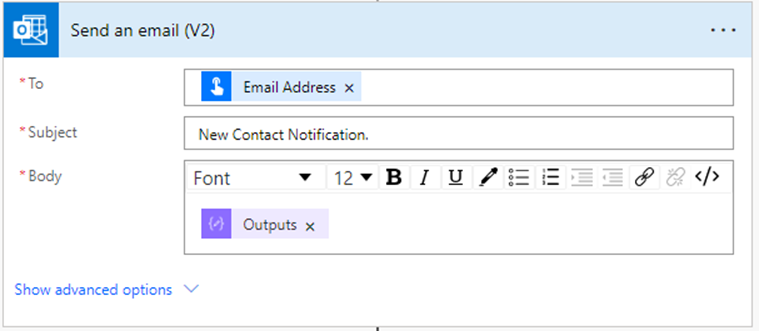
Step 2: Send and Email to the Contact
Now the Parent Flow: We are taking the scenario where on create of a contact, we are sending an email to the contact for successful creation. Let’s create it:
Step 1: Trigger
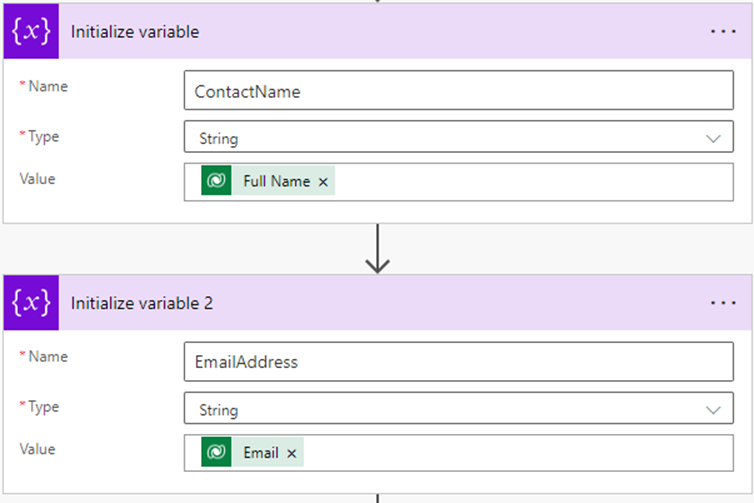
Step 2: Add variables for “Contact name (String)”, “Email Address(String).
Step 3: Use the action as “Run a child flow” to trigger another flow by selecting it and pass data between them.
Save and test the Flow.
Parent Run:
Child Run:
Both the flows ran successfully!
Tip: To trigger a child flow, both the flows need to be in the same solution. If your flows aren’t solution aware, you will run into issues when trying to implement child flows. When you export the solution that contains these two flows and import it into another environment, the new parent and child flows are automatically linked, so there’s no need to update URLs.
Also if your parent flow is triggered from a Canvas app. Then you could use dynamic content that your app passes into your parent flow, and then further pass that into your child flow for information such as the user who clicked the button or the user that was running the app at the given time
Now, I can do further error handling here to do a condition where my parent flow will continue if my child flow was successful, but it will terminate if my child flow wasn’t successful. To return values back to the parent flow, the last action should be a Respond to PowerApp of Flow action.
Life Saver Tip: Now, if you come after a while and see some of your child flows failing and want to debug it but have to search the parent run from the long run history of the parent flow, it is a cumbersome process. To make things easier, I have an easy way out for you.
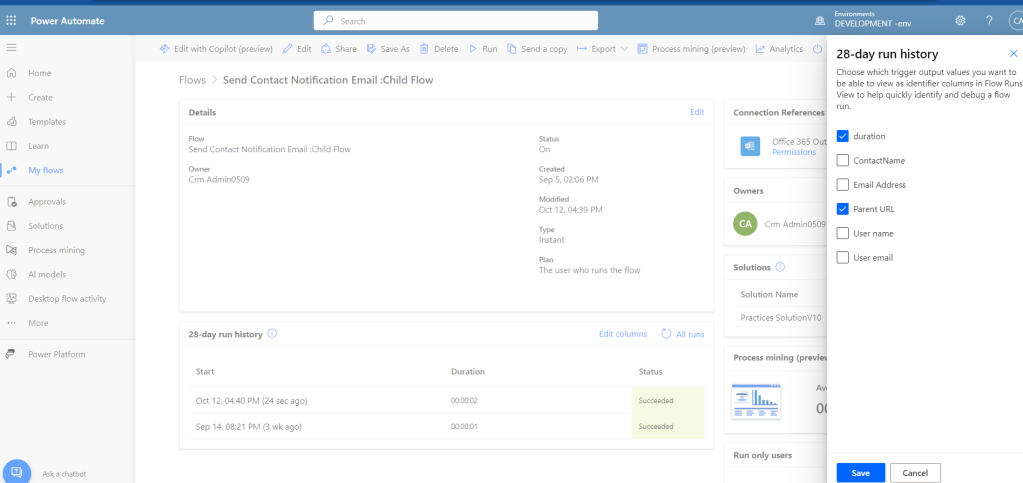
Step 1: Pass the Run URL of the parent flow as a parameter to the child flow.
Step 2: This way you can make it as a column on the Run History table by clicking on the “Edit Columns” and selecting your parameter.
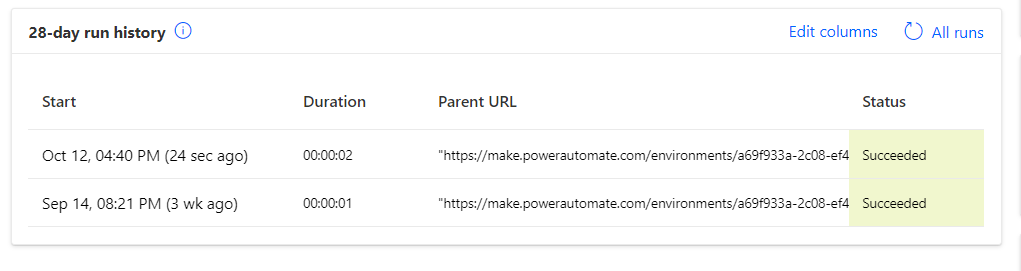
Voila! Here is the final result: Now you can copy the run url of parent flow directly from here. Though i sincerely hope Microsoft makes it in the URl format someday and not a text one, so we will be able to directly land on the parent flow run page. Hoping!
Thus now that you know how to create a child flow and refer back the parent flow, Why don’t you start using it. Flows with a large number of actions may encounter performance issues while you edit them, even if they have fewer than 500. Consider using child flows to reduce the number of actions in a single flow or if you need more than 500. See you next week!
& the Power Affirmation of the day is: “I trust that I’m heading in the right direction.”
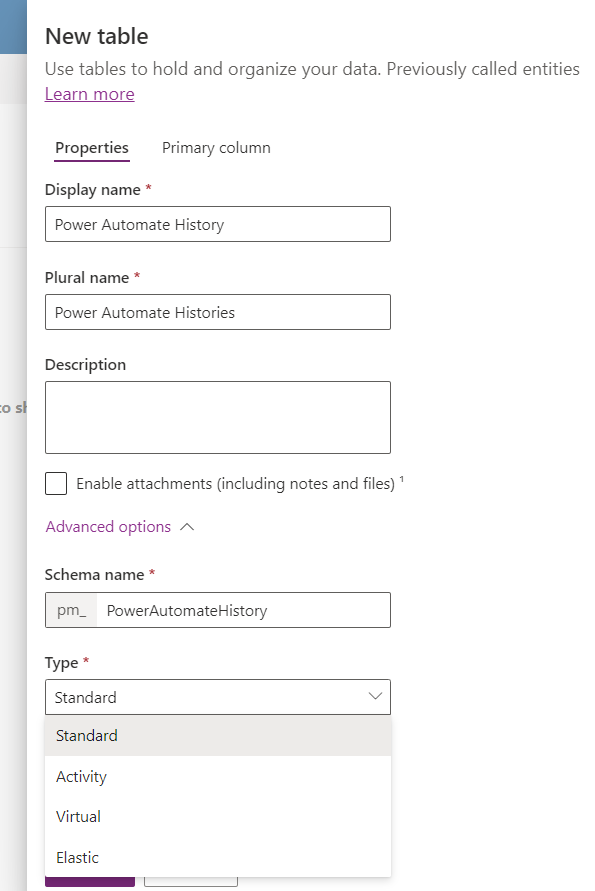
Well! Let’s continue to create our very own custom Power Automate history table. In our last Blog, we got to know how to get the Run URL. Today, we will use it to create the records. You may create it using a standard table but we are going to use Elastic tables.So what are Elastic tables we are all hearing? Lets dig in!!
Theory: An elastic table is a table managed by Microsoft Dataverse which has similar user experience and API that are offered with standard tables. They share many aspects and options which comes with standard tables, but have their own unique features and capabilities that are powered by Azure Cosmos DB. PS: This is a preview feature and not meant for production use and may have restricted functionality which may change in future. Now when you create a table, you have 4 types of options.
As soon as you create one, you see 2 new columns which are not meant for standard tables.
Partition ID: It is a single line of text and is a system-defined Partition Id string column.
Time to Live: It is a whole number and stores data in no. of seconds.This capability allows removal of data automatically after fixed periods and ensure optimization of storage capacity.
Explanation: Let me make it simple for you to comprehend, lets say you have a table that contains data about different books, you can use the book category as the partition id value for the table. In this case, groups of books that have specific values for the book category like Fiction, Non-Fiction, Biography, Historical, etc form distinct logical partitions. hope you got some of the logic, for Developer enthusiasts, you may visit the MS documentation.
Now create the fields you would like to store information in: Run URL – Stores the hyperlink to the Run. [ Make sure to increase the character from 100 to 250.] Value : if you want to track the changing values.
Business Requirement: You want to create your own Power Automate history table, lets say for n no. of days and clear it off post that. Also you may do it for all your flows, or for some flows you want to specially track. You might also store the changed values too in the same record just to search easily.
Solution: Lets start! Step 1: Initialize a variable which stores the number of days you want that record to stay in the system. You may take it as input too. Also, if you do not want a time limitation, leave the Time-to-live field blank and it will stay in the system forever until any further deletion.
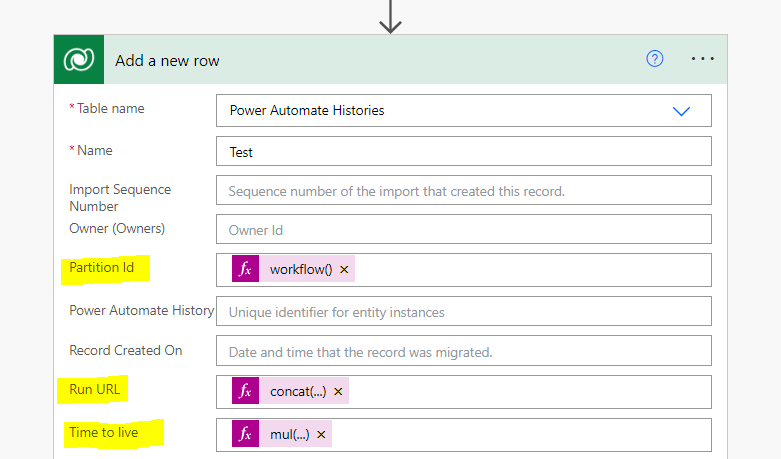
Step 2: Create a new record in your Power Automate History table.
For the partition id, i have used the formulae, workflow().tags.flowDisplayName which stores the flow name which runs. Thus i have used the flow names to partition the table from one to another. You may also use the Flow Guid as the names can change. Created On basically will store when that flow ran. You can store it explicitly using utcNow() in a separate field. For the Run URL, using the expression we learnt last week. For Time to Live,i have used mul(variables(‘Days’),86400) expression. A day has 86400 seconds and we can multiply it with the number of days to keep it existing in the system for the number of days you specify.
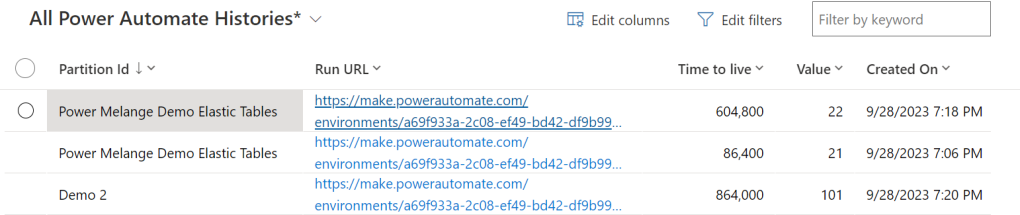
& the result is below:
So now you may easily track, sort & straightaway jump into the flow runs to debug it.
Also a great advantage if using it is, if you try to update the records manually from the UI post creation, you will not be able to do it which i feel is good in a way as you do not want to tamper with the Audit History.
Here is one more idea, you may introduce the status column in this table and mark it Success,failed or Cancelled depending on your Power Automate flow run logic as the last step using branching. Happy Flowing! Happy Automation! Happy Brainstorming!
& the Power Affirmation for the day is: “Be elastic by nature but always come back to your roots”
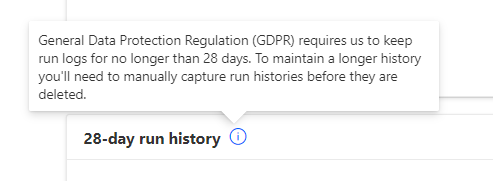
If you see the Run History table of a Power Automate, it says:
Thus, we are going to create our very own Power Automate History table which we can utilise to sort,search find, however we want to track it. In Part 1 of this Blog, we will learn how to obtain the URL of a flow run, which we will store in one of the columns of our table. Let’s get going!
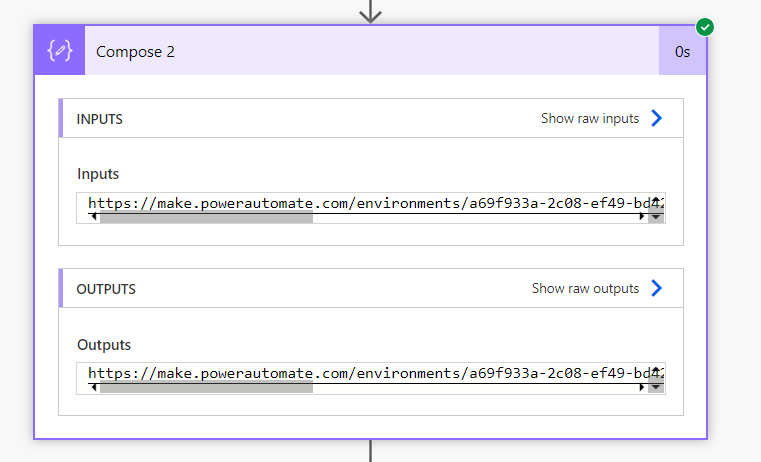
There is a workflow() function we can utilise to see the details of the run of the flow. Thus, add a Compose step to your desired Power Automate.
Lets see what output we get from here.
We have got a JSON from here as below:
Few interesting things to note down from here are that we have the following information available with us: 1. Flow Name (EVEN And ODD) 2. Flow Id (efa78ba8-7270-6295-3a5d-ac65008a81ae) 3. Environment ID (a69f933a-2c08-ef49-bd42-df9b996d5113) 4. Runtime ID (08585063109006059084025408662CU10)
Let’s create this URL in another compose step : concat(‘https://make.powerautomate.com/environments/’, outputs(‘Compose’)[‘tags’][‘environmentName’], ‘/flows/’, outputs(‘Compose’)[‘name’], ‘/runs/’, outputs(‘Compose’)[‘run’][‘name’])
Lets run the flow now:
We see that a URL is formed and if copied in the URL browser, it directly takes us to the flow run page.
You can either use Compose steps or directly add the following expression in your flow step. concat(‘https://make.powerautomate.com/ environments/’, workflow()?[‘tags’][‘environmentName’], ‘/flows/’, workflow()?[‘name’], ‘/runs/’, workflow()?[‘run’][‘name’]) We have used square bracket here, the same can be achieved using period as separators. For eg; let’s say you want the Flow name, so you may write the expression: workflow().tags.flowDisplayName
You may also send custom email notifications from the flow itself that link back to your flow. These notifications can include an HTML link that contains the flow’s display name in the email title and follows this syntax:
< a href=https://make.powerautomate.com/environments/@{workflow()?[‘tags’][‘environmentName’], ‘/flows/’, workflow()?[‘name’], ‘/runs/’, workflow()?[‘run’][‘name’]}.
Stay tuned so as how do we want to store it in Dataverse in the coming week’s Blog!
& the Power Affirmation for the day is “Hold the vision and the faith; more blessings are coming your way.”
In one of my previous Blogs, there was a Business Scenario where on change of Business Process Flow Stage, we had to change the status accordingly. Well, during the Business continuity, there are scenarios where a new BPF Stage and in turn a new Status can be introduced. So what to do in this case, shall we edit our Power Automate to cater to this new status or can we write something from the onset so that we do not have to make changes to our existing Power Automate.
Problem: We have earlier used Switch action to match our Status to the BPF Stage and had separate branches for the updation of the Status and given a new status we have to have a new branch developed, tested & then deployed.
Will you get surprised if I say that well there is a way to write your flow in such a way that you do not have to make any changes to your Power Automate and you still can introduce new statuses and Stages without getting stressed. Assumption: Well the only assumption here is that you should have the same name to the Status & Stage, so that we can compare them!
Solution:Let’s create our flow, I’ll make changes to my original flow itself and explain the changed parts only. So if any old action you want in detail, please refer to my previous blog. My final flow is as follows:
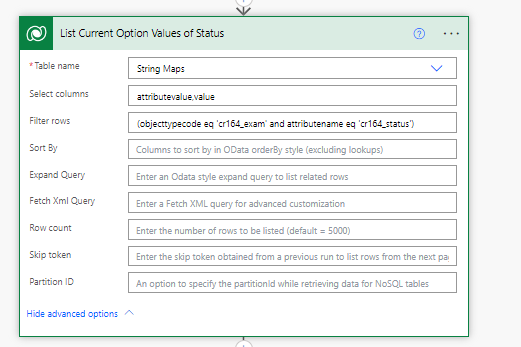
Step1: Firstly what I have done is listed down all the option set values from the desired option set. This you may find in the table “String Maps”. Thats interesting right!
You may filter rows by specifying your table and field name under Filter rows. i.e objecttypecode eq ‘tablename’ and attributename eq ‘fieldname'[eq is equals] This gives a lot of data but to limit my output to just the status name & code, i have applied the values under select columns.
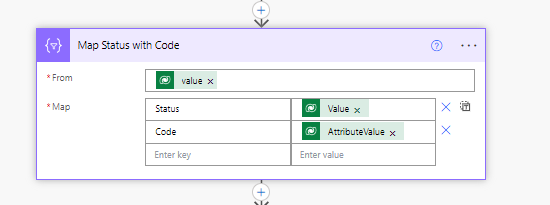
Step 2:I am using the “Select” Data Operation to get the Status and code side-by-side. Here I have introduced two properties – Status & Code. You will refer the values from these property names only, so name it carefully!
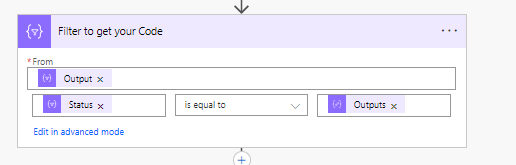
Tip: Use the Data Operation – Select action to transform the shape of objects in an array. Step 3: I am using the “Filter Array” Data operation to match the Status obtained matched from the BPF Stage name. To access only the Status name part, write “item()[‘Status’]”
Tip: Use the Filter array – Data Operation action to reduce the number of objects in an array to a subset that matches the criteria you provide. Please Note:
You can’t use the filter array action to change the shape of objects in the array.
The text on which you filter is case-sensitive.
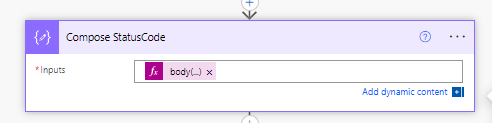
Step 4: Then I am using “Compose” Data Operation to get the code from the filtered array to update the Status. For this I am using the formulae body(‘Filter_to_get_your_Code’)[0][‘Code’] It simply states to get the first element of the array specifically the code property
Tip: Use the Data Operation – Compose action to save your output to check the output in run history.
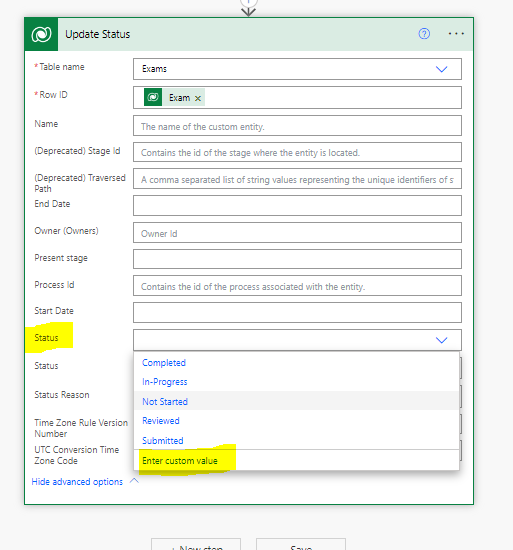
Step 5: Finally, i am updating the Exam Status record using custom value we obtained in the compose step. Note: To update the option sets without using the predefined options, you have to do with with the code, thus choose the “Enter Custom value” and update it with the output of compose.
Application: Initially we had just 5 statuses and stages as below:
I have introduced a new Stage:
And the new Status with the same name:
Now lets see our flow in action!
Lets see all the Data Operations results: Using the Select operation, we got the entire list of option set values along with the respective codes:
The Filter Array gave the result as below:
Finally from the Compose action , we got our desired value:
& the Status is changed:
Hope it helps!
& the Power Affirmation for the Day is: “Put out so much positive energy that the Universe has no option but to return it”
Perform Changeset request is an action from Microsoft dataverse, which is used to perform a set of actions in totality or not perform it at all. Basically all actions inside it will be rolled back into its previous stage if any action under “Perform changeset request” fails.
You will find only 3 actions available to use under “Perform Changeset request”:
Add a new row.
Delete a row.
Update a row.
Business Scenario: So if you want to mandatorily create a Contact if an Account is created successfully otherwise you would not create both OR maybe you want to add a record only if a certain account is deleted successfully, ChangeSets action can be a game changer in it.
Please See: We also have something called as “Configure Run After” but this will only consider the outcome of the previous step & not the next step and has a completely different use case altogether. If you want the sequential steps to have an impact on the previous runned steps, then ChangeSet is the only solution.
Lets see how to use it!
We have created an automated cloud flow with the “Perform Changeset Request” action in it, which triggers on adding a new row.First, we tried to run a flow with only 1 action “add a new row” under “Perform changeset request.”
Then we added a “Delete a row” action with the wrong GUID in it to fail this step.As you can see, when a “Delete a row” action failed, the “Add a new row” action skipped and turns into its previous stage.
Thus in “Perform Changeset” either all actions will run or none.
Please Note: Actions under the “Perform Changeset” are not allowed to reference actions in the same scope & also Configure Run after configuration is not allowed for this action or for the actions within it.
Hope it helps!
& the Power Affirmation for the Day is: “I am in the right place at the right time, doing the right thing”
In this blog, we will learn how to update D365 record fields on change of stage in business process flow using Power Automate.
Every business process flow with in the dynamics 365 CRM instance has an entity related to it. So whenever you create a BPF, an underlying table gets created. On adding the Business Rule to your solution, this table gets added automatically.
Problem Scenario: Sometimes, you might want to update the option set value based on the stage change of the business process flow. For example, you might want to change the status of an opportunity from open to won when the stage changes from propose to close. This can help you keep track of your progress and ensure data consistency.
Solution: Here we are updating the option set value on change of stage in business process flow using Power Automate.
We have created a business process flow with the name of “Exam status” on “Exam” entity.
PS: We can do this with Business Rules too which will be in sync but i am showing you all how to trigger power automates based on Stage change of a BPF in case we ever encounter such a scenario.Here are the steps to follow:
Step 1: Create a flow with the trigger “When a row is added or modified” as below:
Notice here that I have triggered this flow on the Exam Status backend table on modification of the column “activestageid” You can bring this table to the App navigation or use Advanced Find to check its columns. The Exam is the lookup to the exam table where we change stages in the BPF & the Active Stage is the current stage it is in.
Please note it is a lookup too which if you click will say “This is a system entity that does not have a main form. Opening a record form for this entity is not supported.”. Thus it is actually pointing to a table whose name is “Process Stages”
Step 2: Get the Associated Exam record by using triggerOutputs()?[‘body/_bpf_cr164_examid_value’].
Step 3: Initially we saw that the current Stage is a lookup in the Exam Status table pointing to Process Stages table. Retrieve this record using triggerOutputs()?[‘body/_activestageid_value’] .
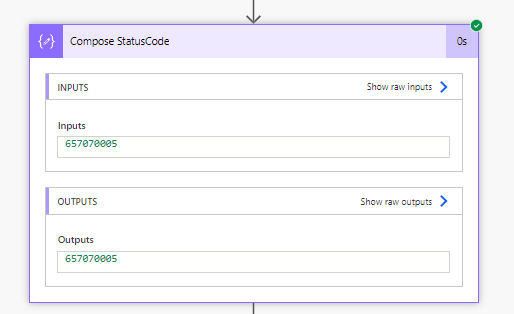
Step 4: Get Stage Name from the above stage record by using Compose outputs(‘Get_Stage_Record’)?[‘body/stagename’]
Step 5: Finally use Switch statement on the output of compose and update the status accordingly for all use cases.
That’s it! You have successfully created a flow that updates the option set value of Status on change of stage in business process flow using Power Automate.
and the Status is updated:
Hope it helps!
One food for thought for you: Here we have used switch cases for all the Option Set values we have as status. So if a new status is introduced, we have to add another branch use case. Can we avoid that, THINK THINK!? See you in the next Blog.
In another newz, this is my 50th Blog and I am so happy to share with you all whatever I have learnt and I am learning in my Power Platform journey. Hoping to stay connected always!
& the Power Quote of the Day is:
“Believe in yourself and everything you are.” ― Shalinee Goel
Business Problem: When someone in the organisation leaves and if they are flow owners of certain Power Automates, then often in Dev Environment, we find connection reference issues coz we have disabled their user ids and others are unable to update that as they are not co-owners of the flow.[Given that you always you one dedicated service admin account for higher environments, well
Solution: As a solution,you could change the owners of all such flows instead of doing it one-by-one and then you can use your own connection reference, update the flow, etc.
Please Note:An owner, co-owner, or an admin can change the owner of a solution-aware flow to another user to ensure business continuity.
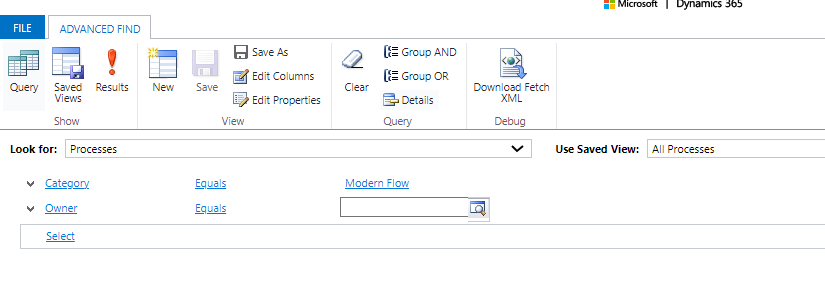
Step 1: Go to Advanced Find and Look For “Processes” table. Step 2: Select filter as “Category equals ‘Modern Flow'”
Step 3: & “Owner equals ‘the person who left the org'”
Change the Look in-You can find them in Disabled Users lookup view>Select & Add
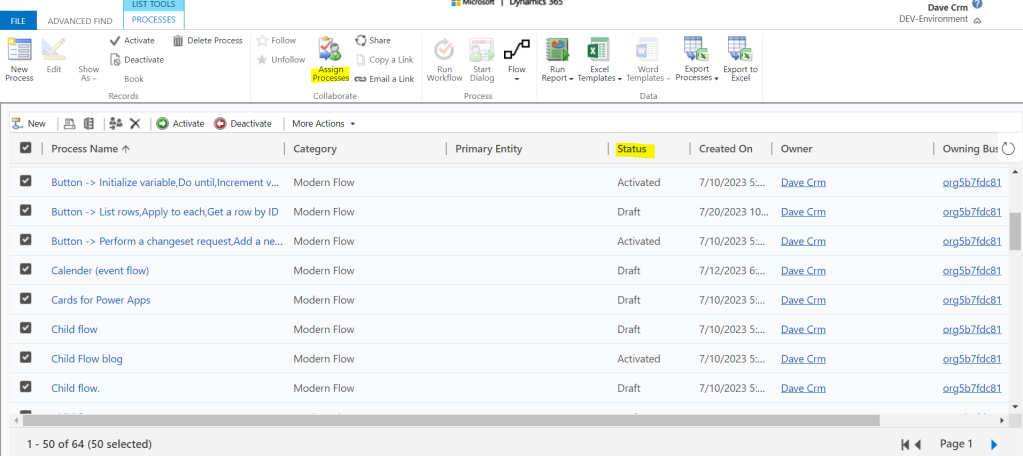
Step 4:Click on Results>Select all the Flows in their name. [You can also filter by Status if needed]
Step 5: Click on “Assign Processes”
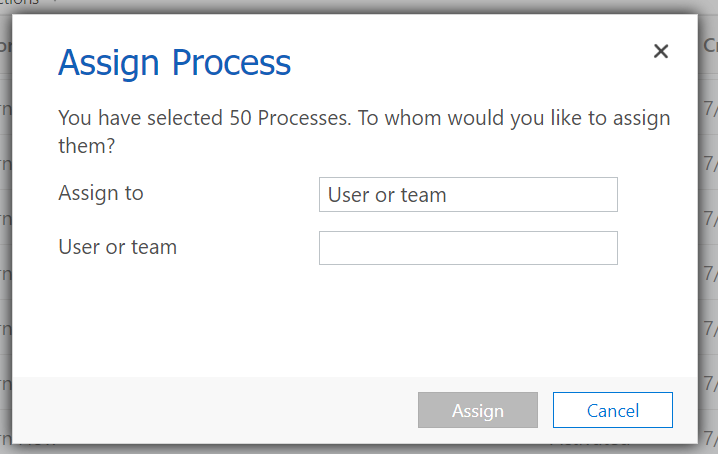
Step 6:By default it assigns to “Me”, change it to “User or Team” and select the desired User and click on “Assign”
Voila! Thus in such simple steps, all the flows which were owned by the last user changes to the new one.
Hope it helps!
& the Power Quote of the day is: “Failure is not the opposite of success: it’s part of success.” — Arianna Huffington